Getting Started
Our new Marketplace Themes system is designed to provide you, as a developer, the most control over the user journey.
Creating the project
If you're using Visual Studio Code, we recommend installing our Theme Development Extension.
You may develop your Marketplace Theme in any framework you prefer, as long as it can be statically hosted. We currently do not support server-side rendering or self-hosting.
For this guide, we'll be using Vite with Preact, using TypeScript as the coding language, and Yarn as the package manager.
In your terminal, navigate to the directory where you wish to make the project, then run the following commands:
# Creates a new Vite project in the subdirectory `my-custom-theme`
yarn create vite my-custom-theme --template preact-ts

# Navigate to the new directory and download dependencies
cd my-custom-theme && yarn
You can run yarn dev to preview your project in the browser.
Connecting with Spiff
To set up your theme so it can correctly be wrapped by Spiff, you'll first need to install a couple of packages.
# Install `theme-bridge` as a dev dependency
yarn add -D @spiffcommerce/theme-bridge

# Install `core`, and optionally `preview` if you wish to display a live 3D preview
yarn add @spiffcommerce/core @spiffcommerce/preview
When your theme is loaded, you'll be able to fetch the bridge service from the window object. When developing locally, you'll need to initialize a development bridge service, by calling setSpiffDevOptions from @spiffcommerce/theme-bridge.
Here's an example of how a main.tsx file might look:
import { render } from "preact";
import { App } from "./app.tsx";
import "./index.css";
import type { SpiffThemeLoader } from "@spiffcommerce/theme-bridge";

// This is just a helper to avoid referencing `(window as any).SpiffThemeLoader as SpiffThemeLoader`
// whenever you need to communicate with the bridge service.
let spiffThemeLoader: SpiffThemeLoader;
export function getSpiffThemeLoader() {
    return spiffThemeLoader;
}
// Assigns the reference to the bridge service, and renders your application.
function setSpiffThemeLoader(loader: SpiffThemeLoader) {
    spiffThemeLoader = loader;
    // Ensure you call this at the appropriate time to hide the loading spinner provided by Spiff
    spiffThemeLoader.themeLoaded();
    spiffThemeLoader.getContext().then((context) => {
        render(<App />, context.container);
    });
}

if (import.meta.env.DEV) {
    // Since the package is only a dev dependency, it's recommended to dynamically
    // import it for the required dev functionality. You don't have to do it like this
    // but it's the easiest way to avoid tree-shaking issues.
    import("@spiffcommerce/theme-bridge").then((themeBridge) => {
        themeBridge.setSpiffDevOptions(
            // The id of the root container element. You can also pass an HTMLElement
            // e.g. `document.getElementById("app")!`
            "app",
            // This options object will be passed to your theme as the "context"
            {
                applicationKey: import.meta.env.VITE_APPLICATION_KEY || "",
                configuration: themeBridge.exampleThemeInstallConfig(),
                type: "transaction",
                workflowOptions: {
                    type: "integration",
                    integrationProductId: import.meta.env.VITE_INTEGRATION_PRODUCT_ID || "",
                },
            }
        );
        // In dev mode, this will only exist after calling `setSpiffDevOptions`
        setSpiffThemeLoader((window as any).SpiffThemeLoader);
    });
} else {
    // In production, the SpiffThemeLoader object will be assigned before your theme is loaded.
    setSpiffThemeLoader((window as any).SpiffThemeLoader);
}
If one doesn't already exist, create the file .env.local in the root of your project. Vite will automatically load environment variables from this file.
VITE_APPLICATION_KEY=<your-application-key>
VITE_INTEGRATION_PRODUCT_ID=<spiff-integration-product-id>
Now run yarn dev again to ensure your project still runs. Open up the inspector and verify that the HTML structure looks like this:
<body>
    <div id="app">
        <div id="spiffThemeWrapper">
            ...your project's components here...
        </div>
    </div>
</body>
Using the context
Now that the bridge service is successfully wrapping your theme, you're ready to start developing the user experience.
Firstly you'll want to start by passing the context from the bridge service to your main component. Open up app.tsx and change the function component to accept the context as a parameter:
import type { ThemeContext } from "@spiffcommerce/theme-bridge";

export function App(props: { context: ThemeContext }) {
    // ...
}
Alternatively:
import { FunctionalComponent } from "preact";
import type { ThemeContext } from "@spiffcommerce/theme-bridge";

export const App: FunctionalComponent<{ context: ThemeContext }> = ({ context }) => {
    // ...
}
You'll then need to update main.tsx to supply the context to the component:
//...
function setSpiffThemeLoader(loader: SpiffThemeLoader) {
    spiffThemeLoader = loader;
    // Ensure you call this at the appropriate time to hide the loading spinner provided by Spiff
    spiffThemeLoader.themeLoaded();
    spiffThemeLoader.getContext().then((context) => {
        // Pass the context to the App component
        render(<App context={context} />, context.container);
    });
}
//...
Initializing an experience
The ThemeContext type is actually a Union Type, with the type field differentiating the members in the union. As this system matures, more context types will be made available for you to implement into your theme.
In this guide, we'll be assuming your theme will only be launched using the transaction type, which is intended to be used with our Workflow Experience system.
Here's how you might initialize a Workflow Experience, and use @spiffcommerce/preview to view it in 3D:
In main.tsx, we create a static instance of the 3D preview service. This is done here to avoid re-initializing it when the app.tsx file gets updated, though you may do it elsewhere.
The preview service is then passed to the App component to render the 3D preview on a canvas.
// ... other imports
import { SpiffCommerce3DPreviewService } from "@spiffcommerce/preview";

// Create a singleton instance of the preview service. Multiple instances are not supported.
const previewService = new SpiffCommerce3DPreviewService({
    environmentFile: "https://assets.babylonjs.com/textures/environment.env",
    transparentBackground: true,
});

// This is just a helper to avoid needing to use `(window as any).SpiffThemeLoader as SpiffThemeLoader`
// whenever you need to communicate with the bridge service.
let spiffThemeLoader: SpiffThemeLoader;
export function getSpiffThemeLoader() {
    return spiffThemeLoader;
}
function setSpiffThemeLoader(loader: SpiffThemeLoader) {
    spiffThemeLoader = loader;
    // Ensure you call this at the appropriate time to hide the loading spinner provided by Spiff
    spiffThemeLoader.themeLoaded();
    spiffThemeLoader.getContext().then((context) => {
        // Pass the context, and the preview service to the App component
        render(<App context={context} previewService={previewService} />, context.container);
    });
}
// ...
Then, in app.tsx, the App component is updated to accept an instance of SpiffCommerce3DPreviewService. An instance of the SpiffCommerceClient is initialized, passed to the bridge service to configure it, then used to initialize a workflow experience.
import "./app.css";
import { FunctionalComponent } from "preact";
import type { ThemeContext, ThemeContextTransaction } from "@spiffcommerce/theme-bridge";
import { useEffect, useState } from "preact/hooks";
import {
    GetNewWorkflowOptions,
    SpiffCommerceClient,
    WorkflowExperience,
} from "@spiffcommerce/core";
import { getSpiffThemeLoader } from "./main";
import { SpiffCommerce3DPreviewService } from "@spiffcommerce/preview";

export const App: FunctionalComponent<{
    context: ThemeContext;
    previewService: SpiffCommerce3DPreviewService;
}> = ({ context: ctx, previewService }) => {
    const [context] = useState(ctx as ThemeContextTransaction);
    const [client, setClient] = useState<SpiffCommerceClient | null>(null);
    const [workflowExperience, setWorkflowExperience] = useState<WorkflowExperience | null>(null);
    const [canvasRef, setCanvasRef] = useState<HTMLCanvasElement | null>(null);

    useEffect(() => {
        const spiffClient = new SpiffCommerceClient({
            applicationKey: context.applicationKey,
        });
        // Configures client to connect to the appropriate server.
        getSpiffThemeLoader().configureClient(spiffClient);
        setClient(spiffClient);
        if (context.workflowOptions.type !== "transaction") {
            // Fetches the IntegrationProduct resource from the API
            spiffClient
                .getIntegrationProduct(context.workflowOptions)
                .then((integrationProduct) => {
                    // Initialize a new workflow experience using the default workflow
                    const workflow = integrationProduct.getDefaultWorkflow();
                    spiffClient
                        .getWorkflowExperience(undefined, undefined, undefined, {
                            ...(context.workflowOptions as GetNewWorkflowOptions),
                            workflowId: workflow.getId(),
                        })
                        .then((wfe) => {
                            setWorkflowExperience(wfe);
                            // Inserts the 3D models associated with the experience into
                            // the 3D preview.
                            wfe.getWorkflowManager().injectIntoPreviewService(previewService);
                        });
                });
        } else {
            throw new Error("Unsupported workflowOptions type.");
        }
    }, [context]);

    useEffect(() => {
        const ref = canvasRef;
        if (ref) {
            // Tells the preview service to render to the provided canvas.
            previewService.registerView(ref);
        }
        return () => {
            if (ref) {
                previewService.unregisterView(ref);
            }
        };
    }, [canvasRef]);

    return !workflowExperience ? (
        <span>Loading...</span>
    ) : (
        <>
            <h1>{workflowExperience.getWorkflowManager().getProduct().name}</h1>
            <canvas ref={setCanvasRef} style={{ width: "700px", aspectRatio: "1/1" }} />
        </>
    );
};
With the developer server still running, you should now see a 3D preview of your test product:
If you've installed new packages, you may need to restart the dev server.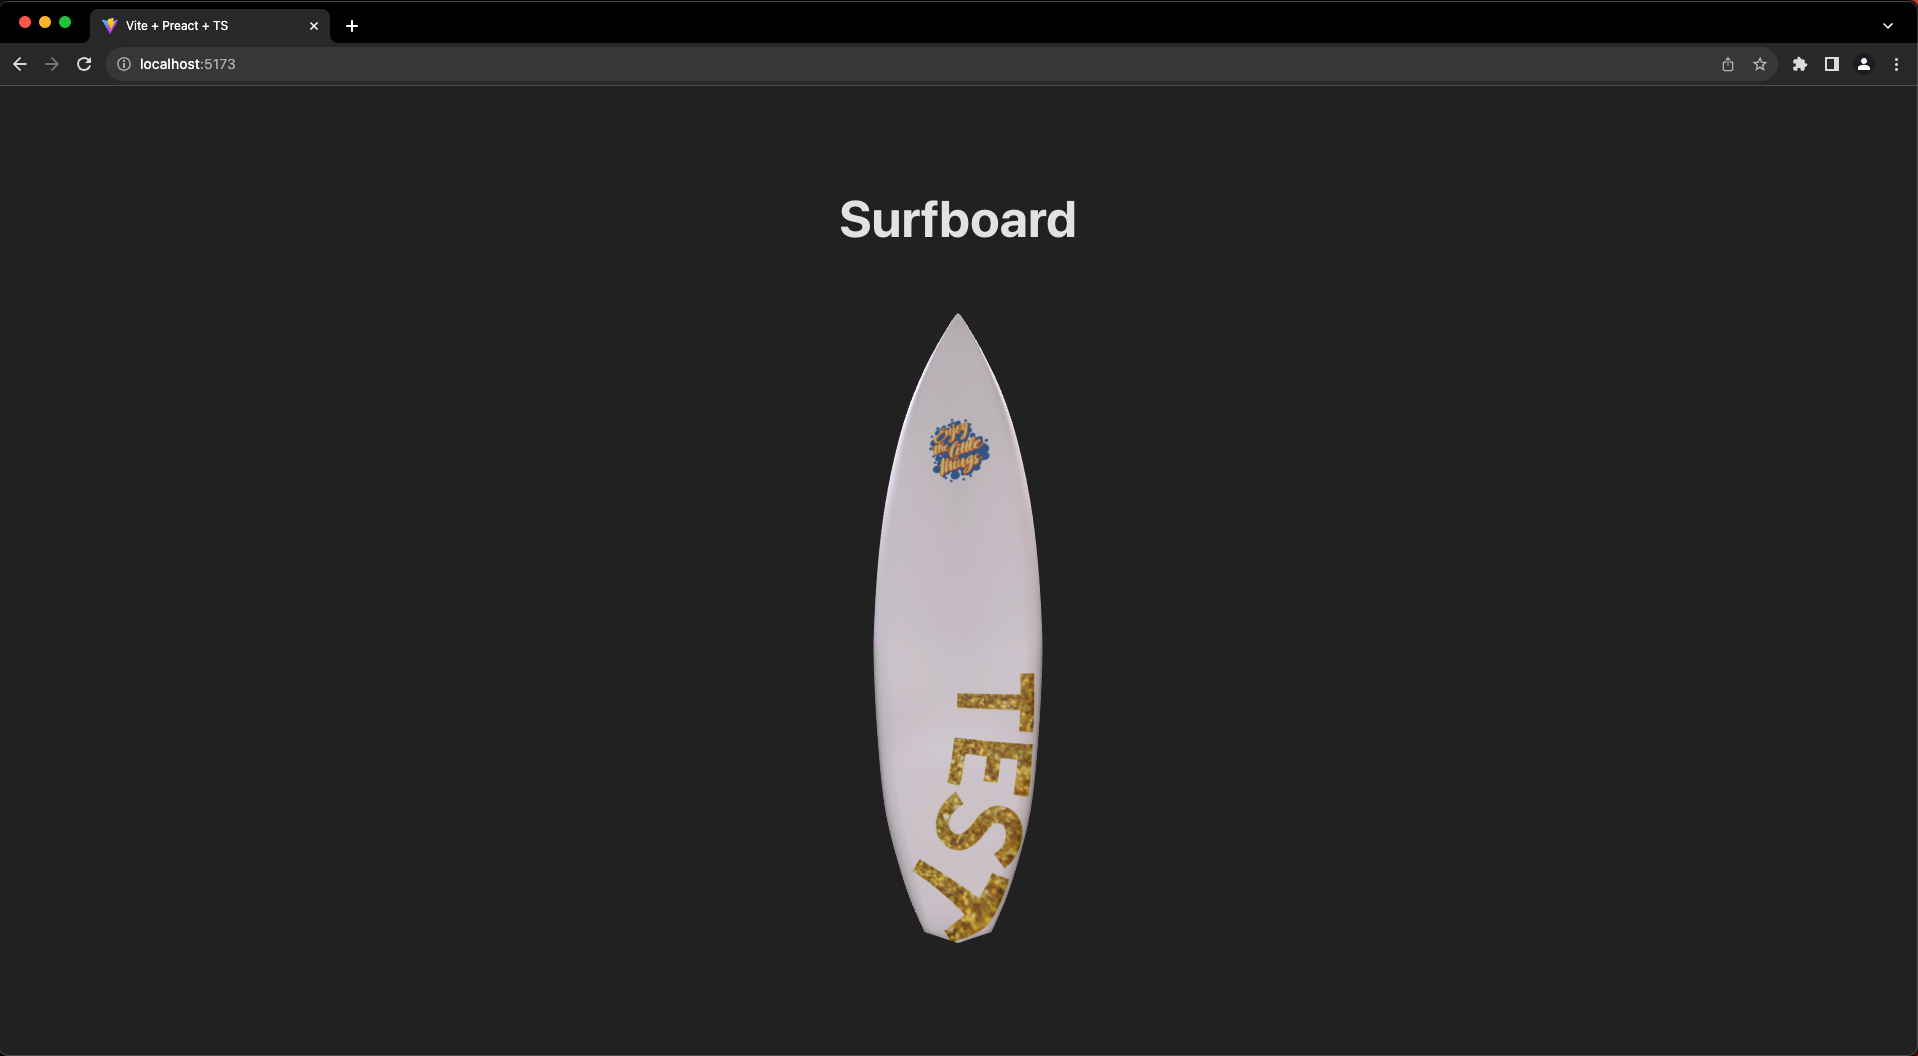
Next steps
Now that you have everything configured, you'll want to follow the Getting Started guide on using @spiffcommerce/core.
There are, however, a few extra steps when using the client inside a Marketplace Theme:
- To exit the experience and close the theme, call
SpiffThemeLoader.close(). This will effectively treat the session as cancelled. - When finishing a design, you should pass the result of the
workflowExperience.onDesignFinishedcall toSpiffThemeLoader.addToEcommerceCart(). This will send a message to the e-commerce platform and end the current session, closing the theme. - The HTML element that wraps your theme will always have the id
spiffThemeWrapper. You can override this component as you see fit. Note there is a default rule that sets both thewidthandheightfields to100%.
Referencing assets
Since your theme's code will no longer be at the root index of the URL, there are some alternative patterns you must follow to reference local assets.
Typically assets will be imported using the following syntax. You may have noticed this in the app.tsx file before it was changed.
import imgUrl from './img.png'
document.getElementById('hero-img').src = imgUrl
However, you'll need to use an alternative method, utilizing import.meta.url. This will construct the URL to the asset based on the location of the currently executing module.
const imgUrl = new URL('./img.png', import.meta.url).href
document.getElementById('hero-img').src = imgUrl
You will also need to update your vite.config.ts file to change the base property. By default, Vite sets this to "/", which leads to undesirable results when the code is deployed to our system, since links to assets prefixed with a slash will navigate all the way back up to the root.
i.e. A reference to assets/img.png will not be https://themes.us.spiffcommerce.com/path/to/theme/assets/img.png, but instead becomes https://themes.us.spiffcommerce.com/assets/img.png.
Luckily, this can easily be remedied by setting the base property to an empty string:
import { defineConfig } from "vite";
import preact from "@preact/preset-vite";

// https://vitejs.dev/config/
export default defineConfig({
    base: "",
    plugins: [preact()],
});